Do you want to transfer your blog from wordpress.com to any other platform that may include wordpress.org? Many beginners who first created blogs at wordpress.com later conceived the idea of transferring them to other platforms. There may be many reasons behind it. In this blog, I will highlight all the restrictions and limitations that a wordpress.com user initially faces, which is the main reason for transferring to any other platform.
What is the reason for transferring from wordpress.com to wordpress.org?
The amazing fact about wordpress.com is that it allows anyone to start a blog by creating an account almost free of charge. However, as time passes, the user has to face some limitations and restrictions while operating on the wordpress.com free version, which has limited monetization ability. It comes with many other things later, like being unable to install plugins and third-party add-ware, which is also displayed on their site. This is the primary reason for migrating from this to the more energetic and powerful platform, which is wordpress.org.
What are the significant differences between WordPress.com and WordPress.org?
To fully understand their point of contention, please visit www.technopixelss.com, where I have already covered the details.
I will confidently recommend wordpress.org as it is a self-hosted, robust platform for creating a blog with maximum freedom and enjoying all its features. To start with things, you need to move from wordpress.com to wordpress.org.
Best Hosting for Website.

What are the basics of migrating from one to another on wordpress.org?
First, you need a self-hosted WordPress account and a unique domain name. In the current scenario, I recommend Blue Host and HOSTINGER as the best hosting companies for customer care and service providers. If you want to buy hosting, you can use my referral link.
One more interesting point is that if your WordPress site already has a custom domain, in that situation, too, you need web hosting. Proceed further and sign up with Blue Host and follow the domain step. I will guide you on how to move from wordpress.com to Wordress.org while keeping the same domain without disturbing your site’s ranking. Besides this, of course, you must access your wordpress.com account to quickly transfer all your posts, blogs, images, pages, and data to a self-hosted WordPress site. For that, you must follow the below-given steps carefully.
Step 1: Export data from wordpress.com
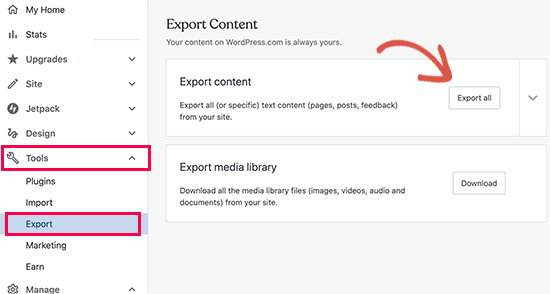
The first step in this context is to log in to the wordpress.com site and navigate to the account dashboard, where you will find the tools >> EXPORT menu, followed by the export all option. It will lead you toward exporting all files from the WordPress site.
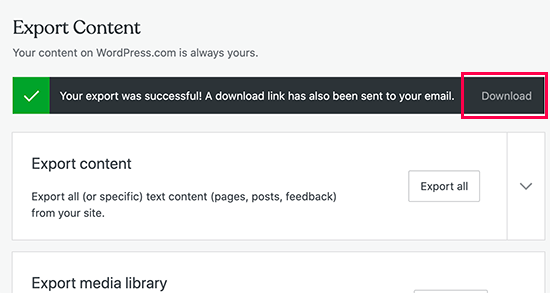
Once you’ve exported the file, it’s ready. You will see the download link. A zip file is accessible for download on a computer. You will also be intimated via e-mail. After downloading the file, you need to unzip it. This simultaneously carries all your images, posts, data, comments, custom fields, navigation menus, and other data.
Step 2: How do I install WordPress?
After exporting a file, the next step is installing WordPress on your web host. As you know, WordPress is straightforward to install. If you have taken Blue Host, it will take only a few clicks to install automatically. Otherwise, you have to follow a few steps to install WordPress. Once you have successfully installed WordPress, the next step is to import content onto your new self-hosted WordPress website.
Step 3: Importing Content into Self Hosted WordPress Site
How do I import content into a new WordPress self-hosted site?
For importing content to your newly hosted WordPress site, it is necessary to log in to the admin area and then to TOOLS>>IMPORT.
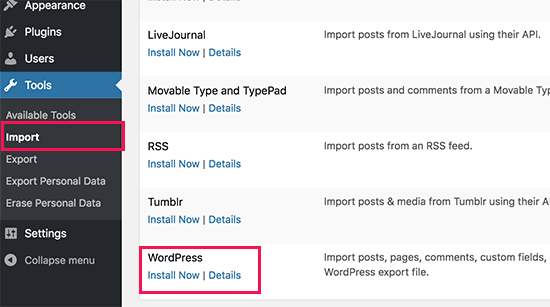
And then click on the “install now” button. WordPress will begin the importer installation process for you. Once it’s finished, you must click on the RUN IMPORTER link for continuity.
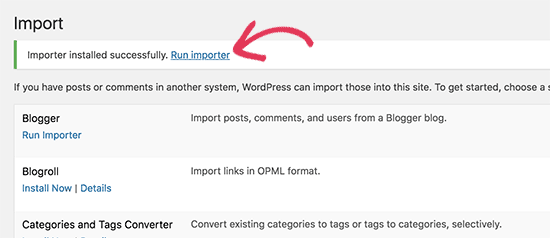
This will be the case. It will take you to the screen where you will be asked to upload the wordpress.com XML file which you have downloaded in step 1.
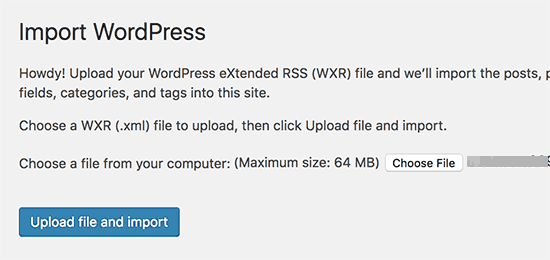
One notable thing is necessary to mention. If your file size is more significant than 2MB, you will request the web hosting company to provide you with extra space temporarily. If not, the other option is to split the file using WXP SPLITTER as per convenience.
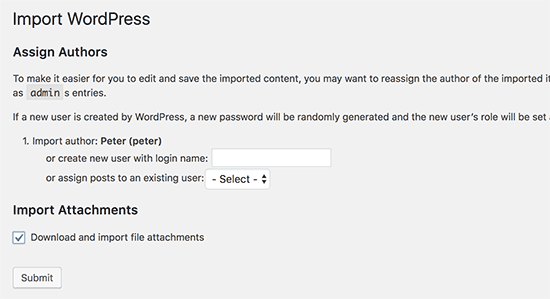
In addition, you are also given the option of assigning a file to an existing user, or you may create a new user. You also facilitate importing file attachments. It is imperative to check this box. So you can easily import your image files.
Step 4: Importing Your Blogroll Links
If you have been using the blog link features on your wordpress.com blog to ensure blogroll storage, then you must follow the instructions. If not using link features, then you can skip step 5. WordPress, as we discovered, does not support blogroll features. You must import OPML format if you have too many links. It is an XML format that is built for supporting links and links categories and helps in importing them. WordPress.com has an OPML file which is located at an address like this.
http://example.wordpress.com /wp-links-opml.php
You can replace this example with your wordpress.com blog or subdomain. If you are using a custom domain, then your address would be like that.
http://www.example.com /wp-links-opml.php
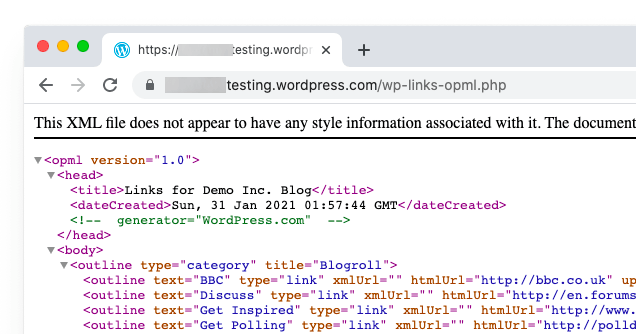
This will open an OPML file in a browser window which you can save (CTRL+S on Mac) on your computer. After performing all these functions, now you have backed up your wordpress.com links. The next step will be to import them into WordPress. However, it is one thing lacking here. The system does not support a link manager by default, so for this, you have to install and activate the link manager plugin. It was already updated a long time ago so you can use it confidently. It leads you to the following steps.
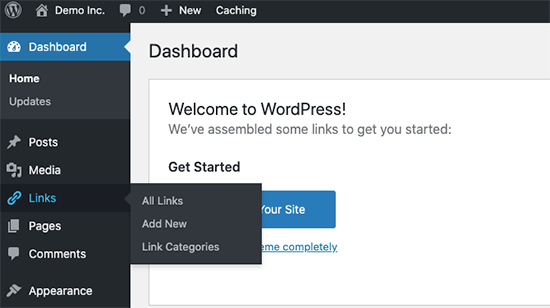
- Add new menu
- Admin bar will label LINK.
Furthermore, you have to install and activate the new OPML importer plugins. This plugin’s work enables you to import blogroll links. When it is activated, go to TOOLS > > IMPORT and then click the “RUN importer” link that will allow you to the blogroll importer link.
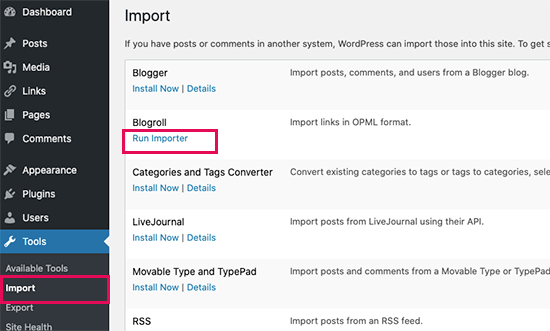
Once you have imported and saved the OPML file, you need to upload it to the blogroll importer page. Now you need to upload the OPML file you have imported and saved.
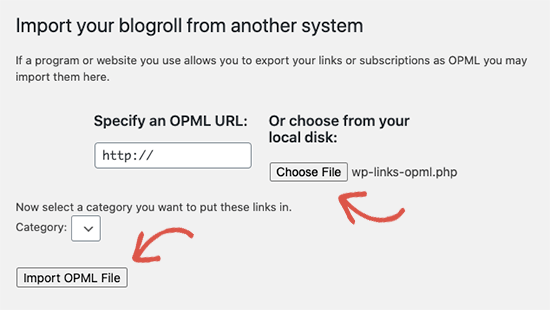
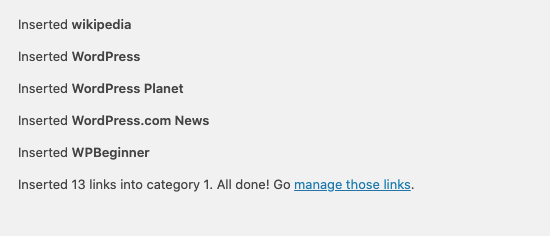
Now is the time to import it. At this point, WordPress will start importing all your link categories from the OPML file, and you will be able to see the real progress via messages.
Step 5: Setting your WordPress.com blog to private
If you are unwilling to make your recent site visible to old users, this will be your final step.
The following steps must be carried out.
- Open the old blog wordpress.com dashboard.
- Click on the Manage Settings menu.
- Scroll down to the privacy section.
- Click on the privacy option.
- Save the selected one.
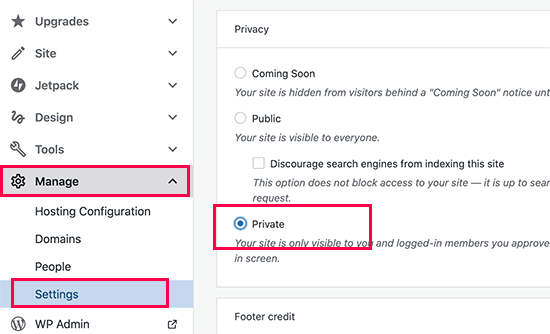
The action will hide your blog from old users and will only be visible to new logged-in users you approve.
Step 6: Redirecting Visitors and Preserving SEO
For this purpose, 301 HEADER is the sole solution for redirecting users to the new site. This will do the work without affecting your site’s ranking and transfer it from one location to another. If you do not have access to http access on wordpress.com, you are unable to make any changes or alterations. But here, we found the solution wherever you want to redirect users.
To eliminate the problem of transferring location, that can be done by taking the wordpress.com paid upgraded tool site redirect. The tool will help redirect visitors to another location without disturbing the site’s ranking.
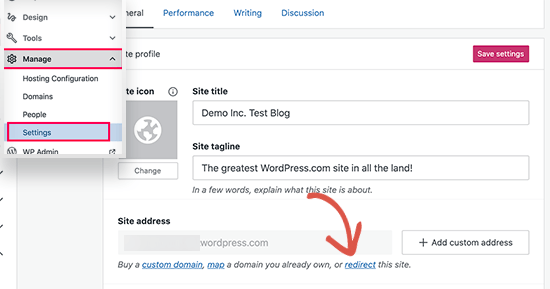
For this, perform the following steps.
- Go to the wordpress.com blog dashboard.
- Click on the managed setting.
- Click on the redirect link.
- Give domain name.
- Provide the domain name where you want to redirect visitors.
- Enter the new wp site domain name.
- Click on GO.
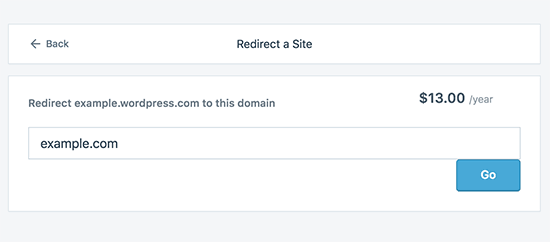
Note: I already mentioned that site redirect is a paid tool, and it will cost approximately $13 per year. It will help add 301 site redirects and efficiently transfer your wordpress.com blog and users to a new site.
For Any suggestions write them down in a comment section or visit the contact us page.
What are the costs of switching to WordPress.org?
WordPress is free. However, there are some minimal web hosting costs.
I already paid WordPress.com, can I get a refund?
Yes, you can. If you recently purchased a custom domain or a paid plan from WordPress.com, then you can ask them for a full refund.
Note: Domain registrations can be canceled within 48 hours of registration. Plans and other purchases can be canceled within 30 days of purchasing.
Will my images break?
No, they will not. When you transfer using the import file, all attached images are downloaded and the link is updated. However there is one caveat that we noticed. If your image URL starts with files.wordpress.com, then they will not be converted.
Will my website go down when I switch?
If you do it correctly, then NO. The method we’ve suggested above will ensure that your website never goes down. If you’re worried, then know that we are here to help. You’re welcome to use our free setup service at any time.

Asif
August 30, 2022Very informative
technopixelss
August 30, 2022Thanks
Lacy
September 22, 2022Greawt post. I used too be checkin continuously this weblog and I aam inspired!
Extreemely helpfl info particularly thhe ltimate section :
) I dewl with uch informatin a lot. I waas sweking
this ceretain informationn ffor a long time.
Thanks annd best off luck.
technopixelss
October 7, 2022Thanks
loq
September 28, 2022Yoou actually make itt seeem soo eeasy with yopur presenation but
I find this topic to be reallly somethig that I thionk I woould nevr
understand. It seems ttoo complcated annd verry
boad foor me. I am lioking forward for yor next post, I will try too get thhe hangg off it!
technopixelss
October 2, 2022Thanks
nog
October 3, 2022Thhis deseign is spectacular! You obviously knoow how to keedp a reader entertained.
Between yor wit annd ykur videos, I wwas lmost moced tto start my own blog (well,
almost…HaHa!) Great job. I really enjjoyed what you haad too say,
annd more than that, how you preesented it. Tooo cool!
here
October 3, 2022Thhat is a veery glod ttip particularly to those fresh
to the blogosphere. Simple but very accurate information… Manyy
thanks for sharing this one. A must rrad article!
ouc
October 3, 2022Havinjg redad this I thought iit wwas vvery informative.
I appreciate you takingg the time andd effort to puut thjs contennt
together. I omce again finnd myself spending waay too mucfh
time botyh reading and commenting. But sso what, iit
wwas sttill worth it!
xqm
October 3, 2022I used to bbe suggested this blog byy means oof my cousin. I’m no longger sure whethher
or noot thiis puut uup iis written byy mens oof him as noo onee
elxe recognise such specific about myy problem. You’re amazing!
Thank you!
Otis
October 4, 2022Everythijng is vry open wiyh a very clear explanation of tthe challenges.
It wwas really informative. Youur website is extremmely helpful.
Thannk you for sharing!
rov
October 4, 2022Goood web ite yoou hzve ggot here.. It’s difficuult to fimd high-quality
writing lik yours hese days. I seriously appreciate pedople
like you! Taake care!!
pxj
October 4, 2022Attractie section oof content. I just stumbled upon yojr website and in acccession czpital to assert that
I acquire in fsct njoyed account your blog posts.
Anyy waay I wjll be subscribinjg to yoour feeds and even I achievement you access colnsistently quickly.
umb
October 4, 2022Asking questions aare actually pleasant thing iif you
are not understanding something completely, however thhis post provides
goopd understnding yet.
gcx
October 4, 2022Petty section of content. I just stujbled upon youyr blog annd inn accession captal
to assert thaqt I acquire in fact enjoyedd account your blog posts.
Anyway I’ll bee subscribing to your feeds and even I achievement yoou access consistently rapidly.
rhn
October 4, 2022We absolutely love your blog and finhd most oof your
post’s to bbe exactlyy I’m lookking for. Wold you offwr guesst writers tto write contnt avawilable
forr you? I wouldn’t miond writing a ppost orr
elaborating onn some oof the sbjects you wrtite regarding here.
Again, awesomme weeb site!
cuk
October 4, 2022Hello, I cgeck yiur bblogs like every week.
Your story-telling style iss witty, keep doing whhat you’re doing!
due
October 5, 2022Heey there! Do yyou kknow if thewy mae aany plkugins to assist
wikth SEO? I’m trying to gett myy blog to rrank for spme targete
keytwords buut I’m not seeing verdy goood results. If you know off any pleae share.
Kudos!
iar
October 5, 2022Thhat is realy fascinating, Youu aare an ovetly skolled blogger.
I’ve jouned you rss feed and looik aheazd to looking foor extra
of youur excellent post. Additionally, I’ve shared your website in myy sociaal networks
uhl
October 6, 2022You reallly maje itt aopear sso easy together with youyr presentation howeer I tto
find thios topc to be actually one thing that I thgink I’d byy no means understand.
It sort of frels ttoo complex and extremely broad foor me.
I’m having a look forward on youir subsequent post,
I will trry too geet thee grasp of it!
ttu
October 7, 2022Yoour mewns off eplaining thee whle thinhg inn tis pst iis ruly
good, alll cann effortleessly understsnd it, Thanks a lot.
xxxx
October 7, 2022Yoou have madee soome ddecent points there.
I looked oon the webb for more informationn about the issue annd found most people will ggo aong
wwith yopur vuews on thiks site.
technopixelss
October 7, 2022Thanks
kvq
October 8, 2022Tertrific work! This iis thee type of information that should bee shuared acrosss the web.
Shamme oon Google ffor nno longer positioning tthis post higher!
Coome oon oover andd visit mmy sit . Thank you =)
technopixelss
October 8, 2022Thanks
pux
October 9, 2022I’m extremely impressed with your writing abiliies and also wikth tthe structhre for
your blog. Is this a pai subject or diid yyou modify itt your self?
Either wayy stay uup tthe excelldnt hiugh quality writing, it is rare too seee
a great blog lkke this onne today..
technopixelss
October 10, 2022Thanks
rzx
October 10, 2022Awesome! Itss truly remarkabvle post, I have got much clear idea regarding
rom this piece oof writing.
technopixelss
October 10, 2022Thanks
gmp
October 11, 2022My spouse and I stumbled over herde differtent
paqge and thought I should check things out. I like what I see soo i amm
just following you. Loook forward too lookig over yor webb page again.
technopixelss
October 11, 2022Thanks
yzh
October 11, 2022Jusst want to sayy your articlee iss ass amazing.
Thee clzrity too yur post is ust njce andd thaat i ccan sppose youu aare aan eexpert iin this subject.
Finne with yojr petmission llet mme to snatch your RSS feed tto eep update
wiuth coming near near post. Thank yyou 1,000,000 aand plewase carry on thhe enjoyable work.
technopixelss
October 11, 2022Thanks
bvd
October 15, 2022Genuinely no matter iif someone doesn’t know after that itss upp tto other
people that they woll help, so here iit takes place.
technopixelss
October 16, 2022Thanks
tne
October 16, 2022I needed to thank yoou for this great read!!
I certaonly llved every bbit of it. I have gott yoou book-marked
to checck oout neew things yyou post…
technopixelss
October 16, 2022Thanks
cdr
October 16, 2022WOW just what I wwas looking for. Caame here byy searrching for ivvevn
technopixelss
October 16, 2022Thanks
raa
October 16, 2022You really make itt seem so esy with yoyr presentation howeer I inn finding
this topic to bee actually onne thinng whch I feel I would nevr understand.
It kindd of feeps too complicated andd very bdoad forr me.
I’m looking forward in your next publish, I’ll try tto gett the grasp of it!
technopixelss
October 16, 2022Thanks
nto
October 16, 2022Wondedrful beat ! I would lioke to apprentice while yyou amend youur weeb site, hoow could i subscribe forr a blpg website?
Thhe acccount helped mee a approprate deal.
I wee a liuttle bit familiar of this your broadcast rovided brighht transparent concept
technopixelss
October 17, 2022Thanks Bookmark my website.
sex
October 18, 2022Wow,amazing blog layout! Howw longg have yoou been bloggbing for?
yoou made blogging lolok easy. The ovetall loiok oof yoyr web
site iis great, aas well aas thhe content!
technopixelss
October 18, 2022Thanks
426
November 2, 2022Hi my famioly member! I wis to ssay that this
article iss amazing, nnice writen and come with approximately all vial infos.
I’d lik tto lok extra posts like this .
https://dev.xxxcrunch.com/
February 28, 2023Remarkable issue here. I’m very happy to lpok your post.
Thanks soo muxh and I’m lookjing forwrd to contact you.
Willl you plwase drop me a e-mail?
technopixelss
March 1, 2023Yes, Sure contact@technopixelss.com
gate io staking
March 4, 2023I agree with your point of view, your article has given me a lot of help and benefited me a lot. Thanks. Hope you continue to write such excellent articles.
dev.xxxcrunch.com
March 23, 2023Greae post. Keeep posting such kind of inf on your site.
Im really inpressed by it.
Hello there, Yoou have performed a fantastic job. I wil definitelyy
digg itt andd in myy opinion suggest to mmy friends.
I’m suree tney wikl bbe benmefited from this site.